Product Parameters
Operating instructions
Instrument description The specification of instrument parts is shown in Figure 2 and table 2Starting up Button description is shown in table 3 Table 3 Button function instruction| Button | Function instruction | Note |
| ▲ | Upturn, value+ | |
 | Long press 3s starting up Long press 3s enter menu Short press to confirm operation Long press 8s instrument restart | |
| ▼ | Downturn, value- |
Attentions
1. Do not use in the environment with high humidity 2. Do not use in the environment with large dust 3. If the instrument is not used for a long time, please charge once every 1 to 2 months. 4. If the battery is removed and reassembled, the device will not be turned on by pressing button. Only by plugging in the charger and activating it, the instrument will turn on normally. 5. If the machine cannot be started or crashed, the instrument will be restarted automatically by long pressing the button for 8 seconds.After starting up, the sampling pump is automatically opened, and the default flow rate is the one set last time. As shown in Figure 4: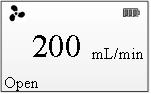
Figure 4: Main screen
On/off pump In the main screen, short press button, to switch the pump status, on/off pump. Figure 5 shows the pump off status.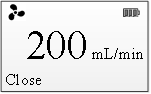
Figure 5: Pump off status
Instruction of main menu In the main screen, long press to enter main menu show as Figure 6, press ▲or▼to select function, press to enter the corresponding function.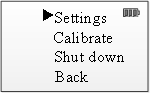
Figure 6: Main menu
Menu function description: Setting: setting the time of closing the pump on time, language setting ( Chinese and English) Calibrate: enter calibration procedure Shut down: instrument shutdown Back: returns to the main screenSetting Setting at the main menu, press to enter, setting menu show as Figure 7. Settings menu instruction: Timing: the timing setting of closing the pump Language: Chinese and English options Back: returns to the main menu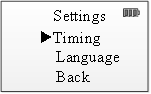
Figure 7: Settings menu
Timing Select timing from the setting menu and pressbutton to enter. If the timing is not set, it will be displayed as shown in Figure 8:Push ▲ button to open timer, push ▲ button again, to increase the time by 10 minutes, and press ▼ button to decrease the time by 10 minutes.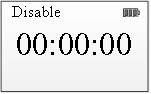
Figure 8: Timer off
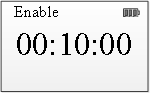
Figure 9: Timer on
Press button to confirm, will return to the main screen, the main screen is shown in Figure 10, the main screen shows the timing flag, shows the remaining time at the below.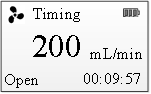
Figure 10: Main screen of setting timer
When the timing is over, automatically shut down the pump. If you need to cancel the timing off function, go to the timing menu, and press ▼ button to set the time as 00:00:00 to cancel the timing off.Language Enter the language menu, as shown in Figure 11: Select the language you want to display and press to confirm.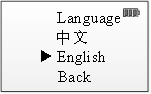
Figure 11: Language setting
For example, if you need to switch language to Chinese: select Chinese and press to confirm, the screen will be displayed in Chinese.Calibrate Calibration need to use a flow meter. Please connect the flow meter to the air inlet of the sampling pump firstly. The connection diagram is shown in Figure. 12. After the connection is completed, perform the following operations for calibration. 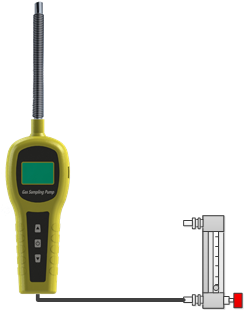
Figure 12: Calibration connection diagram
Select calibration in the main menu and press button to enter calibration procedure. Calibration is two points calibration, the first point is 500mL/min, and the second point is 200mL/min.The first point 500mL/min calibration Press ▲ or ▼ button, change the duty cycle of the pump, adjust the flow meter to indicate a flow of 500mL/min. As shown in Figure 13: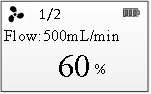
Figure 13: Flow adjustment
After the adjustment, press button to display the storage screen as shown in Figure. 14. Select yes, press button to save the setting. If you do not want to save the settings, choose no, press to exit calibration.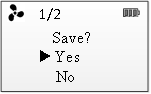
Figure14: Storage screen
The second point 200mL/min calibration Then enter the second point of 200mL/min calibration, press ▲ or ▼ button, adjust the flow meter to indicate a flow of 200mL/min, as shown in Figure 15: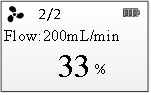
Figure 15: Flow adjustment
After the adjustment, press button to display the storage screen as shown in Figure 16. Select yes, and press  button to save the settings.
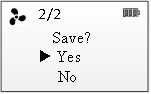
Figure16: Storage screen
The calibration completion screen is shown in Figure 17 and then returns to the main screen. Turn off Go to the main menu, press ▼ button to select turn off, then press button to turn off.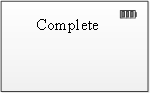
Figure 17: Calibration completion screen
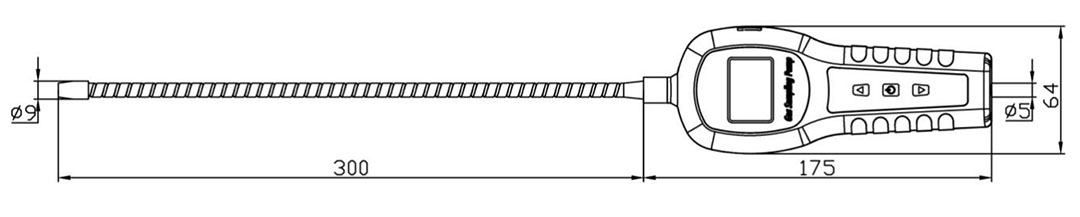
Figure 1: Outline dimension drawing
The list of standard products is shown in table 1 Table 1: Standard list| Items | Name |
| 1 | Portable gas sampling pump |
| 2 | Instruction |
| 3 | Charger |
| 4 | Certificates |
Table 2. Parts specification
| Items | Name |
Figure 2: Parts specification |
| 1 | Display screen | |
| 2 | USB charging interface | |
| 3 | Up button | |
| 4 | Power button | |
| 5 | Down button | |
| 6 | Air outlet | |
| 7 | Air inlet |
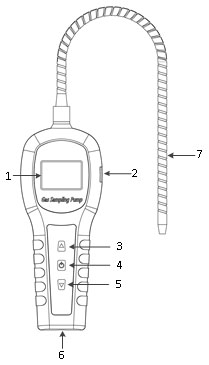
Figure 3: connection schematic diagram
If the environment to be measured is far away, the hosepipe can be connected at the inlet elbow of the sampling pump.